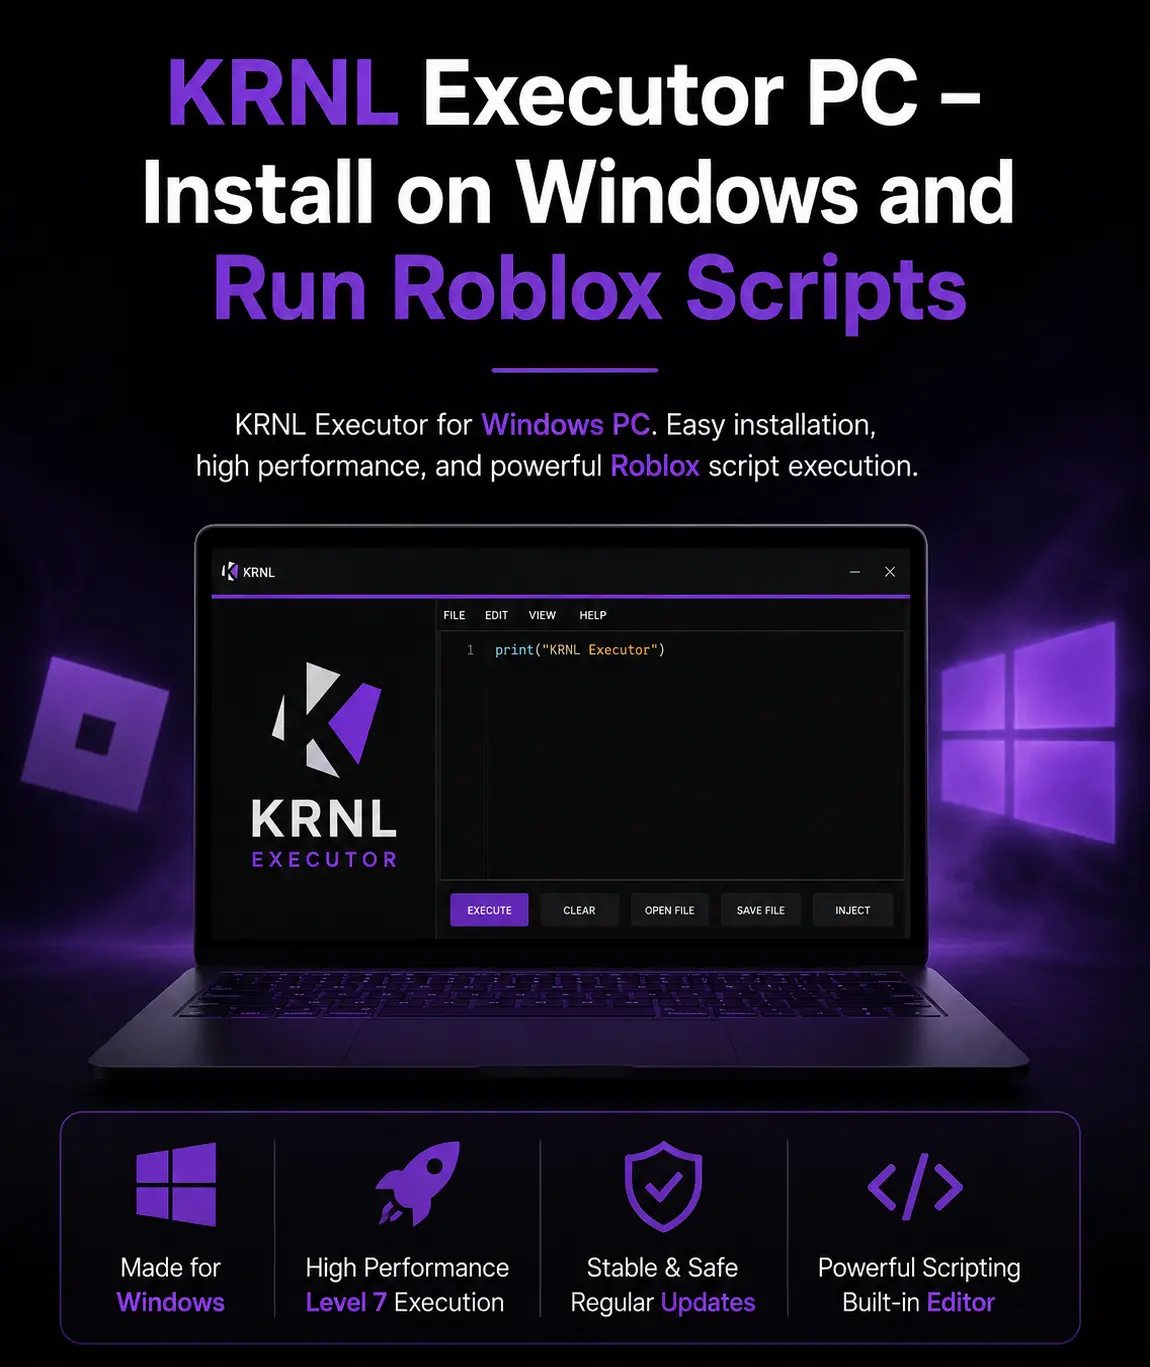
KRNL Executor PC – Install on Windows and Run Roblox Scripts
KRNL Executor has a unique history when it comes to the PC version one that is worth understanding before you download, because it directly affects how you set it up. KRNL was originally developed and launched as a Windows PC executor. It was created by the Ice Bear development team and quickly became one of the most downloaded and trusted free executors in the Roblox scripting community. Its reputation was built entirely on its PC performance. Level 7 execution, stability through Roblox patches, and a powerful built-in scripting environment.
At a certain point, the original native Windows version was discontinued. The team shifted focus to mobile platforms, releasing Android and iOS versions that gained massive adoption. The native PC EXE build went through a period of inactivity that caused confusion in the community about whether a PC version still existed.
As of 2026, there are two ways to run KRNL Executor on Windows. The first is the native Windows installer a direct EXE setup that installs KRNL as a desktop application. The second is through an Android emulator like MuMu Player or BlueStacks, which runs the KRNL Android APK on your Windows machine. Both methods are fully covered on this page with complete step-by-step instructions.
This page is exclusively about the PC and Windows experience. Everything here is specific to desktop users setup process, system requirements, antivirus configuration, performance advantages of desktop execution, laptop compatibility, and the most common Windows-specific issues and fixes. No content from the Android, iOS, or Download pages is repeated here.
KRNL Executor for PC – Why Desktop Execution Is the Superior Experience
Running KRNL on Windows gives you advantages that mobile simply cannot match. If you play Roblox primarily on a desktop or laptop, here is exactly why the PC environment produces better scripting results:
Stronger Hardware Means Faster Execution
Desktop and laptop CPUs and RAM are significantly more powerful than mobile equivalents. Script injection, script parsing, and script execution all happen faster on PC. Complex scripts that take a moment to load on mobile execute nearly instantly on a properly configured Windows machine. This matters most for large script packages with multiple functions running simultaneously.
Full Keyboard and Mouse Control
Scripting on PC gives you precise keyboard and mouse control that touch inputs simply cannot replicate. Navigating the KRNL script editor, pasting large scripts, editing code, and switching between the executor and Roblox is dramatically faster and more accurate with a keyboard and mouse. For users who write or modify their own scripts, the PC environment is essentially mandatory.
Larger Screen and Multi-Monitor Support
On PC, you can run KRNL Executor on one monitor while Roblox runs on another. This means you can monitor the executor’s output, load scripts, and manage your session without ever leaving the Roblox window. Even on a single monitor, the larger screen real estate makes the KRNL interface easier to navigate than on a phone screen.
Multitasking Without App Switching
On mobile, running KRNL alongside Roblox requires constant app switching a friction point that breaks the scripting workflow. On PC, both applications run as separate windows. You can position them side by side, alt-tab between them instantly, or use Windows Snap to keep both visible simultaneously.
More Stable Long-Running Sessions
Mobile devices throttle performance during long sessions due to thermal limits and battery management. PCs run at full performance continuously. If you are running a script that needs to stay active for an extended period an auto-farm that runs for hours, for example, PC sessions are far more stable than mobile.
Method 1 – Native Windows Installer (Direct PC Install)
The native KRNL Executor Windows installer sets up KRNL directly as a desktop application on your PC. This is the most straightforward method for users who want a true native Windows experience.
Before You Install – Antivirus Configuration
This step is essential and must be done before downloading or running the KRNL installer. Windows Defender and virtually all third-party antivirus programs flag executor tools because of how they inject DLL files into running processes. KRNL injects a DLL into the Roblox game client to enable script execution this behavior pattern triggers heuristic detection in antivirus engines even though the KRNL file itself is clean.
If you do not configure antivirus exclusions before installing, Windows Defender may automatically delete the installer or quarantine KRNL files after installation, which will prevent it from running.
Setting up Windows Defender exclusion:
- Open Windows Security from the Start menu or system tray
- Go to Virus & Threat Protection
- Scroll down and click Manage Settings under Virus & Threat Protection Settings
- Scroll to Exclusions and click Add or Remove Exclusions
- Click Add an Exclusion and select Folder
- Create a new folder on your Desktop named “krnl” first, then select that folder as the exclusion
- Click Select Folder to confirm
Everything inside this folder will be excluded from Windows Defender scanning. All KRNL files should be placed inside this folder during and after installation.
For third-party antivirus (Norton, McAfee, Kaspersky, ESET, etc.):
The exclusion process varies by software but follows the same principle. Look for “Exclusions,” “Whitelist,” or “Trusted Files” in your antivirus settings and add the krnl folder you created.
Step-by-Step: Native Windows Install
Step 1 – Create a Dedicated Folder Before downloading, create a new folder on your Desktop named “krnl” (all lowercase). This is where all KRNL files will live and the folder you added to antivirus exclusions in the previous step.
Step 2 – Download the KRNL Windows Installer Click the PC download button on this page to get the KRNL Executor PC download. Save the file directly into the “krnl” folder you created on your Desktop. The downloaded file will be named krnl_bootstrapper or similar do not rename it.
Step 3 – Run as Administrator Right-click the downloaded installer file and select “Run as administrator.” Running with administrator privileges is important because KRNL needs elevated permissions to interact with the Roblox process. Running without admin rights is one of the most common causes of injection failure on first setup.
Step 4 – Follow the Installation Wizard The installer will open a setup wizard. Follow the on-screen instructions. The bootstrapper automatically checks your system for compatibility and downloads any additional required components including krnlss.exe from the internet during installation. Make sure your internet connection is active throughout this process.
Step 5 – Locate krnlss.exe After Installation After the bootstrapper completes, navigate to your Desktop krnl folder. Inside it, you will find a subfolder also named “krnl.” Inside that subfolder is the file krnlss.exe. This is the main KRNL executable you will use going forward. Create a shortcut to krnlss.exe on your Desktop for easier access.
Step 6 – Launch KRNL and Get Your Key Double-click krnlss.exe to launch KRNL Executor. On first launch, it will prompt you for your access key. If you already have one, paste it in. If not, visit the How to Get Key page for the complete key retrieval guide.
Step 7 – Open Roblox and Inject Launch Roblox from the desktop client and join any game. Once you are inside a game session, return to KRNL and click the Inject or Attach button. KRNL will inject into the Roblox process. You will see a confirmation message in the KRNL interface when injection is successful.
Step 8 – Load and Execute Scripts In the KRNL script editor, paste your Lua script or load one from the Scripts Hub. Click Execute. The script will run inside your active Roblox session.
If you do not configure antivirus exclusions before installing, Windows Defender may automatically delete the installer or quarantine KRNL files after installation, which will prevent it from running.
Method 2 – KRNL Executor on PC via Android Emulator
If the native Windows installer is not available or not working on your specific system, running KRNL through an Android emulator is a fully functional alternative. This method installs the KRNL Android APK inside an emulator environment on your Windows machine, giving you complete access to all KRNL features through a virtualized Android environment.
Two emulators are recommended: MuMu Player and BlueStacks. MuMu Player is preferred for Roblox executors because it runs more smoothly with Roblox’s mobile client and produces fewer conflicts with executor injection.
Method 2A – Using MuMu Player (Recommended)
Step 1 – Download and Install MuMu Player Visit the official MuMu Player website and download the latest version. Run the installer and complete the setup. MuMu Player is free and installs like any standard Windows application.
Step 2 – Download the KRNL Android APK Go to the official KRNL Executor website and download the Android APK file to your Windows PC. Save it somewhere you can easily find it your Downloads folder or Desktop works well.
Step 3 – Install the APK in MuMu Player Because MuMu Player is installed, the KRNL APK file will display a blue Android icon in Windows Explorer. You can install it in two ways:
Option A: Double-click the APK file. MuMu Player will automatically detect it and begin installing KRNL inside the emulator.
Option B: Open MuMu Player first, then drag and drop the KRNL APK file into the MuMu Player window.
Step 4 – Launch KRNL Inside MuMu After installation completes, a Roblox game icon will appear inside MuMu Player this is the KRNL Executor interface running in the Android environment. Tap it to launch.
Step 5 – Log In and Join a Game Inside the KRNL/Roblox environment within MuMu, log in to your Roblox account and join any game you want to run scripts in.
Step 6 – Wait for KRNL UI and Enter Key After the game loads, the KRNL UI will appear on screen inside MuMu Player. Enter your KRNL key when prompted. Once your key is accepted, navigate to the script section, paste or load your script, and tap Execute.
Method 2B – Using BlueStacks
BlueStacks is the most widely used Android emulator on Windows and works well for most users. The process is nearly identical to MuMu Player:
- Download and install BlueStacks from the official BlueStacks website
- Download the KRNL Android APK to your PC
- Open BlueStacks and use the APK installer option in the sidebar, or simply double-click the APK file with BlueStacks installed
- Find and launch KRNL from the BlueStacks app drawer
- Log in to Roblox, join a game, and use KRNL to run scripts
BlueStacks may require slightly more RAM than MuMu Player and can run warmer on lower-end PCs, but it is a reliable option if MuMu is not available or preferred.
KRNL Executor Windows – System Requirements
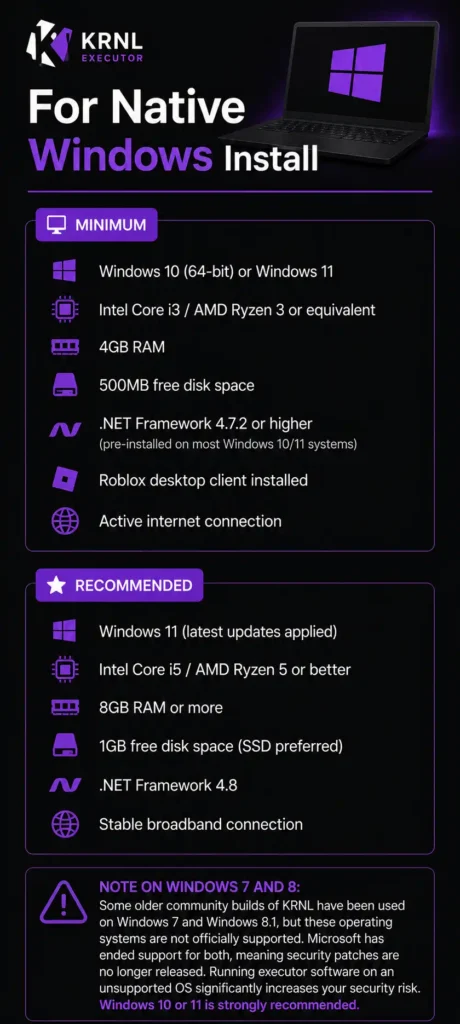
For Native Windows Install
Minimum:
- Windows 10 (64-bit) or Windows 11
- Intel Core i3 / AMD Ryzen 3 or equivalent
- 4GB RAM
- 500MB free disk space
- .NET Framework 4.7.2 or higher (pre-installed on most Windows 10/11 systems)
- Roblox desktop client installed
- Active internet connection
Recommended:
- Windows 11 (latest updates applied)
- Intel Core i5 / AMD Ryzen 5 or better
- 8GB RAM or more
- 1GB free disk space (SSD preferred)
- .NET Framework 4.8
- Stable broadband connection
Note on Windows 7 and 8: Some older community builds of KRNL have been used on Windows 7 and Windows 8.1, but these operating systems are not officially supported. Microsoft has ended support for both, meaning security patches are no longer released. Running executor software on an unsupported OS significantly increases your security risk. Windows 10 or 11 is strongly recommended.
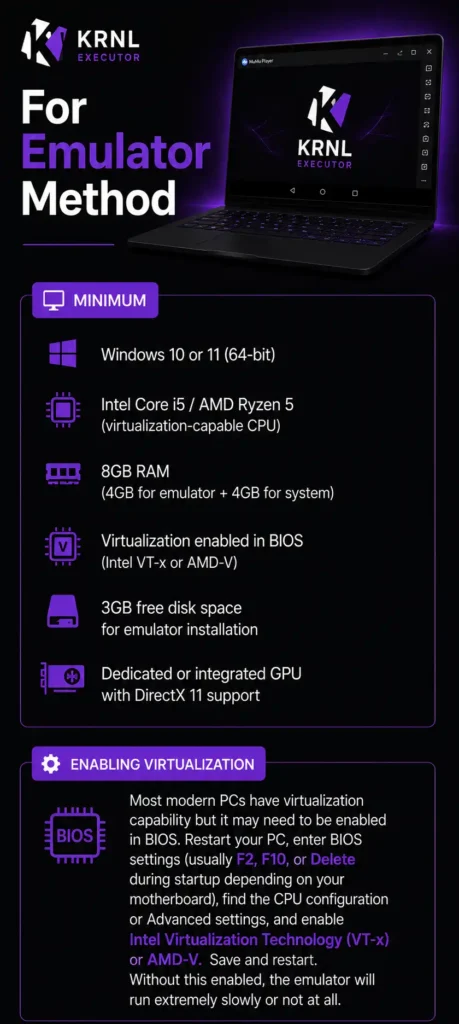
For Emulator Method
Minimum:
- Windows 10 or 11 (64-bit)
- Intel Core i5 / AMD Ryzen 5 (virtualization-capable CPU)
- 8GB RAM (4GB for emulator + 4GB for system)
- Virtualization enabled in BIOS (Intel VT-x or AMD-V)
- 3GB free disk space for emulator installation
- Dedicated or integrated GPU with DirectX 11 support
Enabling Virtualization: Most modern PCs have virtualization capability but it may need to be enabled in BIOS. Restart your PC, enter BIOS settings (usually F2, F10, or Delete during startup depending on your motherboard), find the CPU configuration or Advanced settings, and enable Intel Virtualization Technology (VT-x) or AMD-V. Save and restart. Without this enabled, the emulator will run extremely slowly or not at all.
KRNL Executor Laptop – Does It Work on Laptops?
Yes, KRNL Executor works on laptops running Windows 10 or Windows 11. Both the native installer and the emulator method function the same way on a laptop as they do on a desktop PC. There are a few laptop-specific considerations worth noting:
Performance on Lower-End Laptops
Budget laptops with 4GB RAM and integrated graphics can run KRNL and Roblox together, but performance will be limited. Closing all other applications before launching KRNL and Roblox frees up memory and helps significantly on lower-spec machines. For the emulator method specifically, 8GB RAM is strongly recommended 4GB laptops may struggle to run both the emulator and Roblox simultaneously at acceptable frame rates.
Thermal Management
Laptops can get hot when running script injection alongside Roblox. Make sure your laptop’s vents are not blocked. Using a laptop cooling pad helps maintain stable temperatures during extended sessions. Overheating causes throttling, which slows down both Roblox and KRNL’s injection speed.
Power Settings
Set your Windows power plan to “High Performance” or “Balanced” rather than “Power Saver” when using KRNL. Power Saver mode throttles CPU performance to preserve battery, which can cause slow injection and script execution. Go to Control Panel → Power Options to change this setting.
Battery vs Plugged In
For best performance, keep your laptop plugged in during KRNL sessions. Battery mode typically reduces CPU speed to extend battery life, which affects execution performance.
For more guides and helpful resources, visit KRNL Executor. If you are using a mobile device, you can also check our KRNL for iOS and KRNL for Android pages for additional information and setup guidance.
Antivirus Exclusion – Full Configuration Guide for Windows
Because KRNL Executor for Windows uses DLL injection to interact with the Roblox game client, antivirus software treats it as suspicious. This is a standard false positive that affects every script executor, not something specific to KRNL’s code quality or safety.
Here is the complete exclusion setup for major antivirus programs:
Windows Defender (built-in):
Windows Security → Virus & Threat Protection → Manage Settings → Exclusions → Add or Remove Exclusions → Add an Exclusion → Folder → select your krnl folder
Norton:
Open Norton → Settings → Antivirus → Scans and Risks → Exclusions/Low Risks → Configure → Add
McAfee:
Open McAfee → Navigation → My Protection → Real-Time Scanning → Excluded Files → Add File or Add Folder
Kaspersky:
Open Kaspersky → Settings → Additional → Threats and Exclusions → Trusted Applications → Add
ESET:
Open ESET → Setup → Advanced Setup → Detection Engine → Exclusions → Add
Avast / AVG:
Open Avast or AVG → Menu → Settings → General → Exceptions → Add Exception
After adding the KRNL folder to exclusions in any of the above, redownload the KRNL files if they were previously quarantined, place them inside the excluded folder, and proceed with installation.
KRNL Executor Download PC – What You Are Getting
When you download KRNL Executor for PC, the package includes:
krnl_bootstrapper.exe:
The initial installer that checks your system and downloads the remaining KRNL components.
krnlss.exe:
The main KRNL executable that you run to launch the executor after initial setup is complete.
DLL Components:
Encrypted DLL files that KRNL uses to inject into the Roblox process. These are the files that antivirus programs flag and the reason for the exclusion setup described above.
Script Editor:
A built-in code editor with syntax highlighting for Lua. Paste scripts, type your own, or load from a file.
Scripts Hub Integration:
Access to the KRNL Scripts Hub from within the PC application, same as mobile versions.Auto-Update System-The bootstrapper checks for KRNL updates each time you launch. When Roblox releases a patch that breaks compatibility, updated KRNL files are downloaded automatically on next launch.
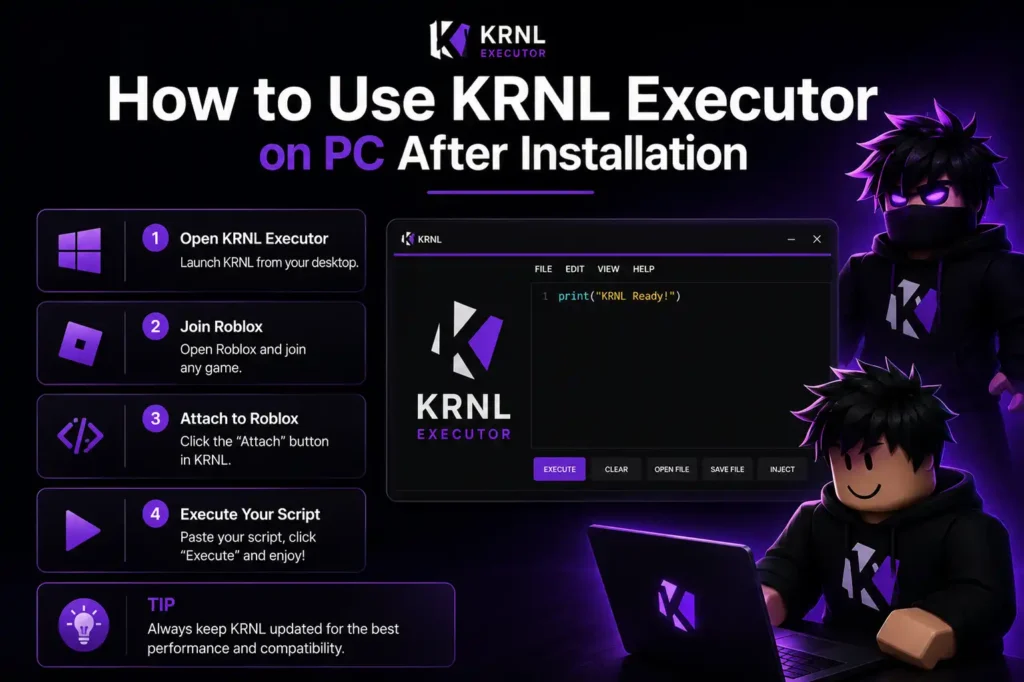
How to Use KRNL Executor on PC After Installation
Once KRNL is installed and your key is active, the workflow for every scripting session is:
- Launch krnlss.exe (or your desktop shortcut) run as administrator
- Open the Roblox desktop client and log in
- Join any Roblox game and wait until fully loaded
- In KRNL, click Inject or Attach wait for the success confirmation
- In the script editor, paste your Lua script or load from the Scripts Hub
- Click Execute
- Switch to Roblox to see the script running
You do not need to re-enter your key every session unless it has expired. KRNL remembers your key between sessions until expiry.
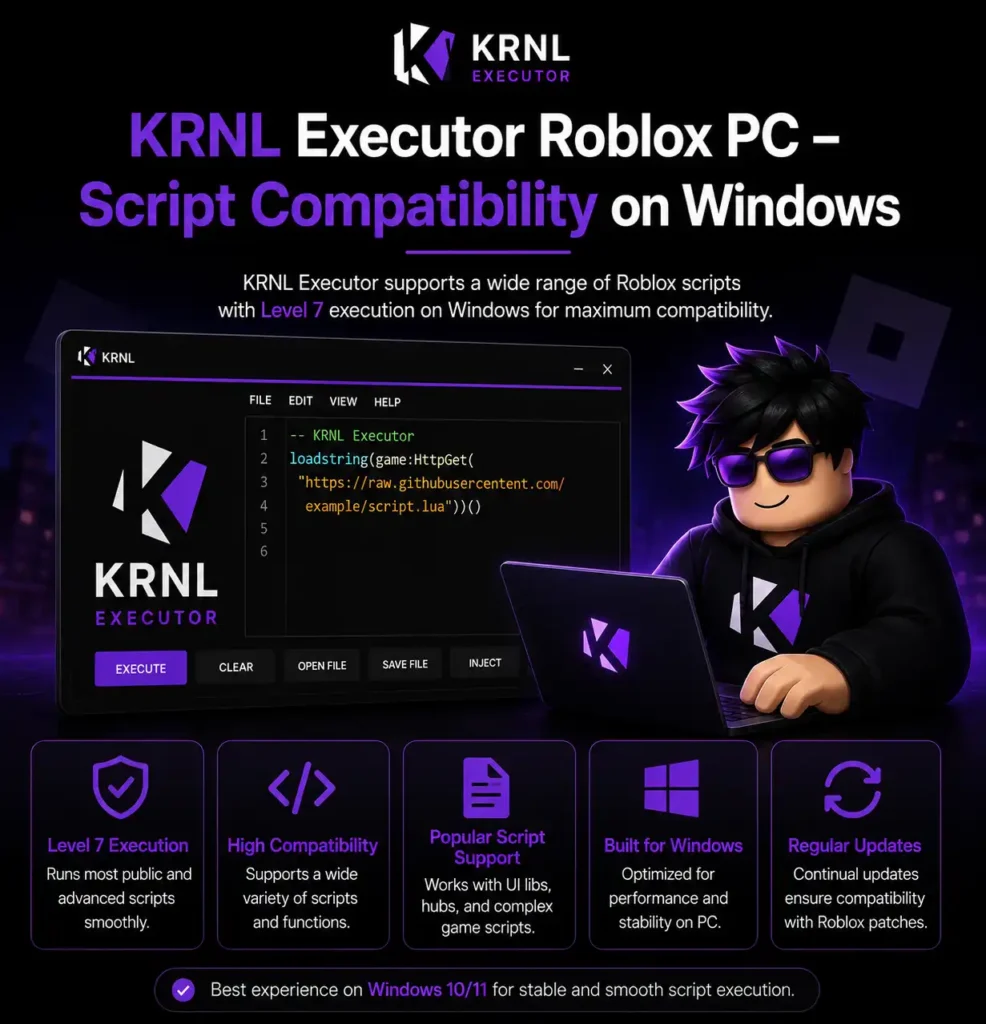
KRNL Executor Roblox PC – Script Compatibility on Windows
The PC version of KRNL executor roblox pc delivers the same 98% UNC support as mobile, but with the added advantage of being able to handle longer and more complex scripts without memory pressure. Scripts that push the limits of mobile execution due to RAM constraints run smoothly on PC where memory is more available.
Popular script types used with KRNL on PC include:
Auto-farm scripts:
Run for extended periods without the session instability that can affect mobile. Ideal for long grinding sessions in games like Blox Fruits and Pet Simulator.
GUI-heavy scripts:
Scripts with complex graphical interfaces, multiple panels, and real-time data displays render more smoothly on PC due to stronger GPU and CPU resources.
Development and testing scripts:
Many Roblox script developers use KRNL on PC specifically because the larger script editor and keyboard input make writing and testing scripts much faster than on mobile.
Multi-function script packages:
Scripts that run multiple functions simultaneously (ESP + auto-farm + teleport in one package, for example) benefit from PC’s higher RAM ceiling and consistent CPU performance.
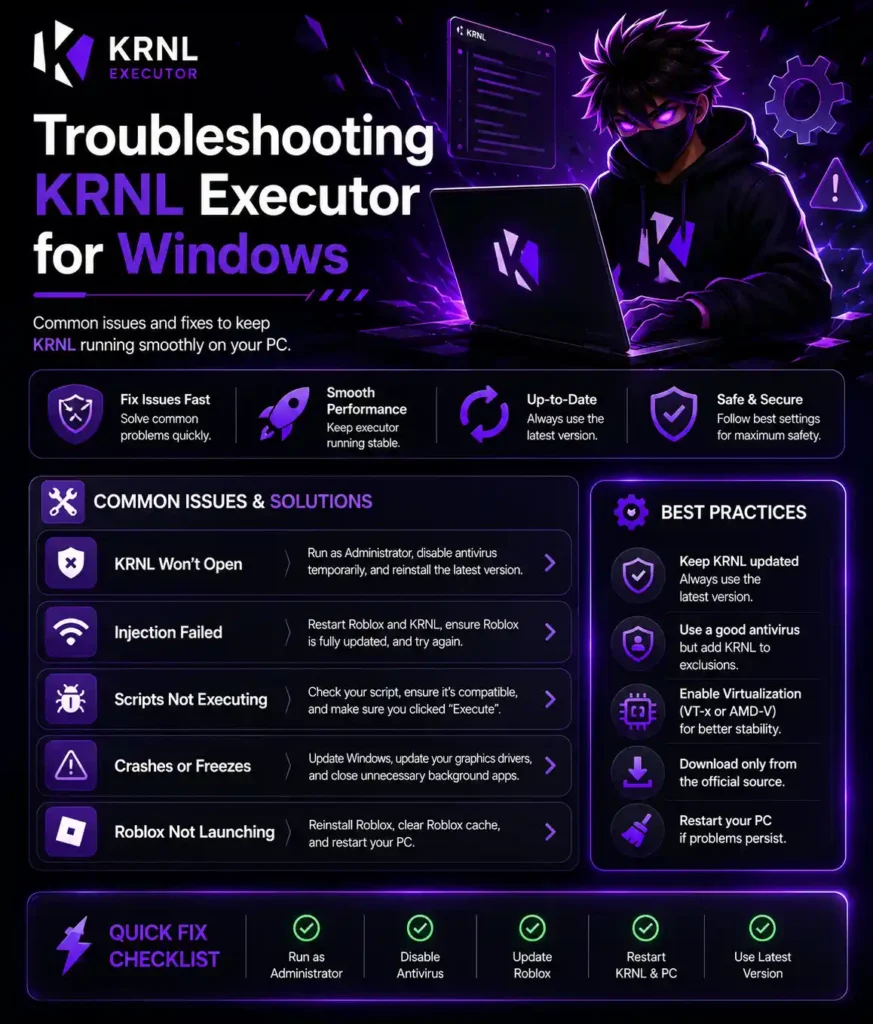
Troubleshooting KRNL Executor for Windows
KRNL installer is blocked or deleted by antivirus
You did not complete the antivirus exclusion setup before downloading. Re-add the exclusion for your krnl folder, then redownload the installer directly into that excluded folder.
KRNL crashes on launch
Make sure you are running krnlss.exe as administrator. Right-click → Run as administrator. Also verify that .NET Framework 4.7.2 or higher is installed check via Control Panel → Programs → Turn Windows Features On or Off → look for .NET Framework versions.
Injection fails “Failed to inject” error
This is usually caused by one of three things: Roblox was not fully loaded into a game when you clicked Inject (always wait until you are inside a game, not on the Roblox home screen); an antivirus program blocked the DLL injection even with the folder excluded (temporarily disable real-time protection during injection); or the current KRNL build is outdated after a Roblox update (launch the bootstrapper to download the latest files).
KRNL opens but the script editor is blank after pasting
Try using Ctrl+V to paste instead of right-clicking. Also confirm the script is fully copied some very long scripts get cut off if copied from a browser that limits clipboard content.
Emulator is running slowly
Ensure virtualization is enabled in BIOS. Check that no other resource-heavy applications are running alongside the emulator. Close background processes using Task Manager before launching the emulator.
KRNL key expired on PC
Keys expire after a set period on all platforms. Open KRNL and follow the key prompt to get a new one. The How to Get Key page has the full guide.